Yoga Postures For Lower Back Pain Relief
My mother had lower back pain for years. She tried pills. She tried heat packs. Nothing worked well. Then her doctor said try yoga. She was skeptical. But she tried it. Within two weeks, she felt better. Not perfect. But better.
This is not just my mother's story. Millions of people have this problem. Sitting all day. Standing all day. Lifting things wrong. Getting older. All these things hurt your back.
Yoga helps. I will show you how. And I will show you the poses that yoga postures for lower back pain relief.
Why Your Back Hurts?
Let me explain this simply.
Your back muscles hold you up all day. They work hard. They get tired. They get tight. When muscles get tight, they pull on your spine. This causes pain. Also, your belly muscles might be weak. Weak belly muscles mean your back has to work harder. It does extra work it was not made to do. This causes pain too.
And there is stress. When you are stressed, your whole body tightens. Your shoulders go up. Your jaw clenches. Your back muscles get hard as rocks. This hurts. So we need to fix three things. Stretch the tight muscles. Strengthen the weak muscles. Calm down the stress.
Yoga does all three.
Read Also: Yoga For Lower Back Pain Beginners
What Science Says?
Doctors have studied this. They wanted to know if yoga really works.
One big study looked at many smaller studies. They put all the results together. They found that yoga helps people with lower back pain. It works about as well as going to physical therapy. Another study followed people for three months. Half did yoga. Half did normal care. The yoga group had less pain. They could move better. They took less medicine.
This is real. This is proven.
Before You Start
- I need to tell you something important.
- Back pain can be serious. Sometimes it means something is wrong with your spine. Sometimes it means a nerve is pinched. Sometimes it means something else.
- So talk to your doctor first. Tell them you want to try yoga. Ask if it is safe for you.
- When you do the poses, go slow. Do not push hard. If something hurts sharp, stop. Not the kind of hurt from exercise. Sharp hurt. That is your body telling you to stop.
- Use pillows. Use blankets. Use blocks if you have them. Whatever makes it comfortable.
The Poses
Here are the poses. I put them in order. Start with the first one. Do each one slowly.
Pose One: Child's Pose
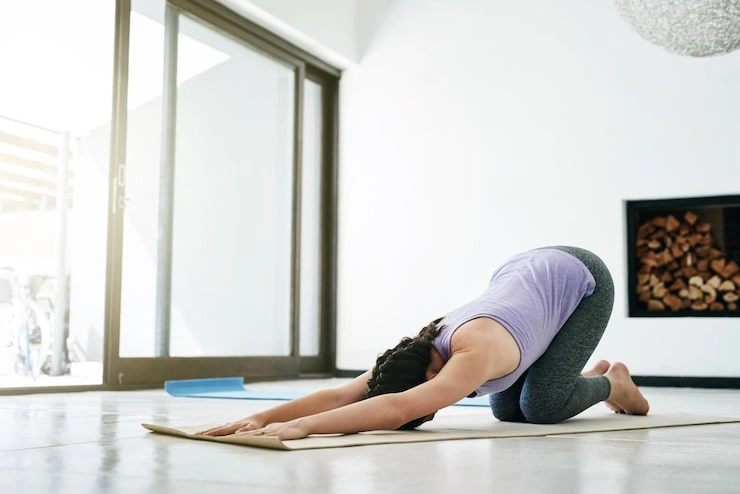
This is the easiest pose. It is also the most helpful. Get on your knees on the floor. Touch your big toes together. Sit back on your heels. Now bend forward. Put your chest on your thighs. Put your forehead on the floor. Stretch your arms out in front of you.
That is it. Just rest there. If your head does not reach the floor, put a folded blanket under it. If your knees hurt, put a pillow under them. Stay here for one minute. Breathe normal. Feel your back stretch. Feel it relax. This pose is good because it takes all the weight off your back. Your spine gets a break. The muscles get longer. The tension goes away.
Pose Two: Cat and Cow
- This one is two poses. You move between them.
- Get on your hands and knees. Hands under shoulders. Knees under hips. Back flat.
- Now breathe in. Drop your belly down. Lift your chest up. Look forward. This is Cow.
- Now breathe out. Round your back up like a cat. Tuck your chin down. Look at your belly. This is Cat.
- Move slowly. One breath for Cow. One breath for Cat. Do this ten times.
- This moves your whole spine. It warms up the joints. It gets blood flowing. Stiff backs feel better after this.
Pose Three: Legs Up the Wall
- This pose is so simple. But it works wonders.
- Sit on the floor next to a wall. Lie down on your back. Swing your legs up on the wall. Your back is on the floor. Your legs are straight up. Your body makes an L shape.
- Close your eyes. Rest your arms at your sides. Stay here for three minutes. Or five minutes. Or ten. However long feels good.
- This pose gives your lower back a complete rest. The wall holds your legs. Your back does nothing. It just relaxes.
- Also, this pose calms your nerves. It helps you sleep better. It lowers stress.
Pose Four: Bridge
- This one is harder. But it makes you stronger.
- Lie on your back. Bend your knees. Put your feet flat on the floor. Feet should be hip width apart. Arms on the floor next to you.
- Press your feet into the floor. Lift your hips up. Keep your knees pointing forward. Do not let them fall outward. Hold for three breaths. Lower down slowly.
- Do this five times.
- This pose works your glutes. That is your butt muscles. Strong glutes help support your lower back. This pose also works your belly muscles. Strong belly means less work for your back.
Pose Five: Spinal Twist
This one is gentle. You do it lying down.
Lie on your back. Bring your knees up to your chest. Stretch your arms out to the sides. Let your knees fall to the right. Turn your head to look left.
Stay there for five breaths. Then bring your knees back to center. Let them fall to the left. Turn your head to look right. Stay for five breaths.
This twists your spine gently. It stretches the small muscles between your bones. These muscles get tight from sitting. This pose releases them.
Putting It Together
You do not have to do all these poses every day. Start with two or three.
Here is a short routine.
- Start with Cat and Cow. Do ten rounds.
- Then do Child's Pose. Stay for one minute.
- Then do Legs Up the Wall. Stay for three minutes.
- That is enough for day one. It takes maybe five minutes.
- As you get stronger, add Bridge. Do it five times.
- Then add Spinal Twist at the end.
When to Do It?
- Morning is good. Your back is stiff from sleeping. Yoga wakes it up gently.
- Evening is good too. Your back is tired from the day. Yoga helps it relax.
- You can do it twice a day. Morning and night. But once a day is fine too.
- The key is to do it regularly. Every day is better than three times a week. Even five minutes every day is better than thirty minutes once a week.
You May Also Like: Yoga Postures For Back Pain Relief
What to Expect?
Do not expect magic on day one.
The first time you do these poses, your back might feel the same. Or it might feel a little sore. That is normal. You are using muscles in a new way. After a week, you might notice a difference. Your back feels looser. The pain is not as sharp.
After a month, you will probably feel much better. The pain might still be there sometimes. But it will be less. It will not control your life anymore. This is what happened to my mother. After two weeks, she could bend over to tie her shoes without wincing. After a month, she stopped taking pain pills. After three months, she was gardening again. Something she had not done in two years.
Things That Help
Here are some yoga postures for lower back pain relief.
- Use a yoga mat. It gives you grip. It is soft on your knees.
- Wear comfortable clothes. Nothing tight. Nothing that restricts movement.
- Breathe. This is the most important part. Do not hold your breath. Breathe in through your nose. Out through your nose. Slow and steady.
- Do not compete with anyone. This is not a race. This is about helping your body. Go at your own speed.
- Be patient. Your body took years to get tight and weak. It will take time to get better. That is normal.
When to Stop?
- Sometimes yoga is not right for you.
- Stop if you feel sharp pain. Not the kind from working out. Sharp pain. Like something is wrong.
- Stop if you feel dizzy. Stop if you feel sick.
- Stop if your pain gets worse the next day. That means you pushed too hard.
- Talk to your doctor if any of these things happen.
Conclusion
Lower back pain is awful. It makes everything hard. It makes you grumpy. It steals your sleep. But you can do something about it. Yoga is free. You can do it at home. You do not need special equipment. The poses I showed you are safe. They are gentle. They work. Start today. Even if you only do five minutes. Even if you only do one pose. Just start. Your back will thank you.