


Ever feel both sluggish and antsy at the same time? Maybe you spent the day working inside without catching any vitamin D; now you're too tired to take a walk but too wired to crash on the couch. There's one way to hit reset and find mind-body balance—get on your mat.
Here, yoga teacher Beth Shaw—author of Healing Trauma with Yoga: Go From Surviving to Thriving with Mind-body Techniques—shares an at-home sequence to support keyboard warriors who need to transition from work hours to "me" time. These poses will target your hips, shoulders, chest, back, and hamstrings, so you can open your body, release tension, and transition to your free time feeling good.
Hold each pose for 5-10 breaths, and then rest in Savasana for a few minutes to round out your session.
See also Stiff Back? 9 Poses to Loosen Up
Getting into the pose: Lie on your back with your legs straight out in front of you. Bend your right knee, and place your foot on the floor next to your left leg thigh. Press into your foot and lift your pelvis up enough to shift it to the right, and then gently release it to the floor. Keep your right shoulder on the mat and use your left hand to gently draw your right knee over the left and toward the floor.
Holding the pose: Keep both shoulders placed on the mat and look over your left shoulder to maximize the benefit of the twist. Practice releasing your knee toward the floor with every exhale. Then switch sides.
See also Looking for a Refresh? Energize with a Reclining Twist
" data-full-src="http://www.stayyogafit.com/wp-content/uploads/2020/09/spinal-twist-3.jpg" data-image-id="ci026f2b2f8000266a" data-image-slug="Spinal Twist (3)" data-public-id="MTc1NDA2Mzg2MjUzOTk3OTMw" data-srcset="https://www.yogajournal.com/.image/ar_3:2%2Cc_limit%2Ccs_srgb%2Cfl_progressive%2Cq_auto:good%2Cw_320/MTc1NDA2Mzg2MjUzOTk3OTMw/spinal-twist-3.jpg 320w, http://www.stayyogafit.com/wp-content/uploads/2020/09/spinal-twist-3.jpg 700w, https://www.yogajournal.com/.image/ar_3:2%2Cc_limit%2Ccs_srgb%2Cfl_progressive%2Cq_auto:good%2Cw_960/MTc1NDA2Mzg2MjUzOTk3OTMw/spinal-twist-3.jpg 960w, https://www.yogajournal.com/.image/ar_3:2%2Cc_limit%2Ccs_srgb%2Cfl_progressive%2Cq_auto:good%2Cw_1400/MTc1NDA2Mzg2MjUzOTk3OTMw/spinal-twist-3.jpg 1400w" data-sizes="(min-width: 675px) 700px, 100vw" data-thumbnail="https://www.yogajournal.com/.image/c_fill%2Ccs_srgb%2Cg_face%2Ch_80%2Cq_auto:good%2Cw_80/MTc1NDA2Mzg2MjUzOTk3OTMw/spinal-twist-3.jpg" data-title="Supta Matsyendrasana (Supine Spinal Twist)">Benefit of the pose: Fish pose opens your chest and shoulders. The contoured shape of the egg blocks fully supports your spine when it's in an extended position. With this support, the body can remain at rest for a more restorative approach.Getting into the pose: From a seated position with your knees bent and feet flat on the mat, place three egg blocks together behind you. Roll back so that your upper back lands on top of the rounded edge of two of blocks, adjusting as necessary. (The blocks can go anywhere along your upper back, from the bottom of your ribcage to your shoulders.) Support the back of your head with the flat side of one block. Do not place the blocks under your lower back. Straighten your legs in front of you and release your arms out to your sides in a comfortable position.
Holding the pose: With each exhale, release tension and relax more and more into the blocks. Enjoy the stillness. You can hold this pose for 5-10 breaths or up to several minutes.
See also Root Down, Lift Up: Fish Pose
Try these yoga egg blocks to help you build this pose
" data-full-src="https://www.yogajournal.com/.image/ar_3:2%2Cc_limit%2Ccs_srgb%2Cfl_progressive%2Cq_auto:good%2Cw_700/MTc1NDA2Mzg2MjUzOTMyMzk0/supported-fish-pose.jpg" data-image-id="ci026f2b2ea000266a" data-image-slug="Supported Fish Pose" data-public-id="MTc1NDA2Mzg2MjUzOTMyMzk0" data-srcset="https://www.yogajournal.com/.image/ar_3:2%2Cc_limit%2Ccs_srgb%2Cfl_progressive%2Cq_auto:good%2Cw_320/MTc1NDA2Mzg2MjUzOTMyMzk0/supported-fish-pose.jpg 320w, https://www.yogajournal.com/.image/ar_3:2%2Cc_limit%2Ccs_srgb%2Cfl_progressive%2Cq_auto:good%2Cw_700/MTc1NDA2Mzg2MjUzOTMyMzk0/supported-fish-pose.jpg 700w, https://www.yogajournal.com/.image/ar_3:2%2Cc_limit%2Ccs_srgb%2Cfl_progressive%2Cq_auto:good%2Cw_960/MTc1NDA2Mzg2MjUzOTMyMzk0/supported-fish-pose.jpg 960w, https://www.yogajournal.com/.image/ar_3:2%2Cc_limit%2Ccs_srgb%2Cfl_progressive%2Cq_auto:good%2Cw_1400/MTc1NDA2Mzg2MjUzOTMyMzk0/supported-fish-pose.jpg 1400w" data-sizes="(min-width: 675px) 700px, 100vw" data-thumbnail="https://www.yogajournal.com/.image/c_fill%2Ccs_srgb%2Cg_face%2Ch_80%2Cq_auto:good%2Cw_80/MTc1NDA2Mzg2MjUzOTMyMzk0/supported-fish-pose.jpg" data-title="Matsyasana (Fish Pose)">Benefit of the pose: Great for releasing tension and stress, Pigeon stretches the deep glute muscles in the back of the hips. It also helps to stretch the illiotibial (IT) band, thick fascial tissue similar to a tendon, that runs along the outside of the thigh, from the hip down to the knee. (If you run a lot, you may notice this area gets tight!)Getting into the pose: From Downward Facing Dog, bring one leg forward to the floor with your knee bent and your front foot flexed. Extend your other leg long behind you. Stay lifted enough to keep your pelvis level.
Holding the pose: Release your upper body to the floor, and rest your forehead on your hands or stacked fists. Slide a block or a blanket under your front hip for extra support and release.
See also Master Sleeping Pigeon Pose in 4 Steps
" data-full-src="https://www.yogajournal.com/.image/ar_3:2%2Cc_limit%2Ccs_srgb%2Cfl_progressive%2Cq_auto:good%2Cw_700/MTc1NDA2Mzg2MjUzOTMyMTM4/pigeon-pose-2.jpg" data-image-id="ci026f2b2ed000276a" data-image-slug="Pigeon Pose (2)" data-public-id="MTc1NDA2Mzg2MjUzOTMyMTM4" data-srcset="https://www.yogajournal.com/.image/ar_3:2%2Cc_limit%2Ccs_srgb%2Cfl_progressive%2Cq_auto:good%2Cw_320/MTc1NDA2Mzg2MjUzOTMyMTM4/pigeon-pose-2.jpg 320w, https://www.yogajournal.com/.image/ar_3:2%2Cc_limit%2Ccs_srgb%2Cfl_progressive%2Cq_auto:good%2Cw_700/MTc1NDA2Mzg2MjUzOTMyMTM4/pigeon-pose-2.jpg 700w, https://www.yogajournal.com/.image/ar_3:2%2Cc_limit%2Ccs_srgb%2Cfl_progressive%2Cq_auto:good%2Cw_960/MTc1NDA2Mzg2MjUzOTMyMTM4/pigeon-pose-2.jpg 960w, https://www.yogajournal.com/.image/ar_3:2%2Cc_limit%2Ccs_srgb%2Cfl_progressive%2Cq_auto:good%2Cw_1400/MTc1NDA2Mzg2MjUzOTMyMTM4/pigeon-pose-2.jpg 1400w" data-sizes="(min-width: 675px) 700px, 100vw" data-thumbnail="https://www.yogajournal.com/.image/c_fill%2Ccs_srgb%2Cg_face%2Ch_80%2Cq_auto:good%2Cw_80/MTc1NDA2Mzg2MjUzOTMyMTM4/pigeon-pose-2.jpg" data-title="Pigeon Pose">Benefit of the pose: This pose strengthens the entire back of your body, including your hamstrings, glutes, back extensors, upper back, and rear shoulder muscles. It also prepares you for more intense back work in poses like Bow and Camel.Getting into the pose: Lie face-down and turn one cheek to the floor with your arms to your sides. Reach back with your toes and activate your inner thighs and core center. Squeeze your shoulder blades toward your spine, lifting your chest and shoulders away from your mat, and let your head follow. Keep your palms facing inward and reach your fingers toward your feet.
Holding the pose: Maintain a good connection through your core center to protect your lower back. Imagine that you are stretched like a hammock and continue to reach your toes and head away from each other, spreading the work throughout your body.
See also Learn to Backbend Better: Locust Pose
" data-full-src="https://www.yogajournal.com/.image/ar_3:2%2Cc_limit%2Ccs_srgb%2Cfl_progressive%2Cq_auto:good%2Cw_700/MTc1NDA2Mzg2MjU0MDYzMjEw/locust-pose.jpg" data-image-id="ci026f2b2e8000266a" data-image-slug="Locust Pose" data-public-id="MTc1NDA2Mzg2MjU0MDYzMjEw" data-srcset="https://www.yogajournal.com/.image/ar_3:2%2Cc_limit%2Ccs_srgb%2Cfl_progressive%2Cq_auto:good%2Cw_320/MTc1NDA2Mzg2MjU0MDYzMjEw/locust-pose.jpg 320w, https://www.yogajournal.com/.image/ar_3:2%2Cc_limit%2Ccs_srgb%2Cfl_progressive%2Cq_auto:good%2Cw_700/MTc1NDA2Mzg2MjU0MDYzMjEw/locust-pose.jpg 700w, https://www.yogajournal.com/.image/ar_3:2%2Cc_limit%2Ccs_srgb%2Cfl_progressive%2Cq_auto:good%2Cw_960/MTc1NDA2Mzg2MjU0MDYzMjEw/locust-pose.jpg 960w, https://www.yogajournal.com/.image/ar_3:2%2Cc_limit%2Ccs_srgb%2Cfl_progressive%2Cq_auto:good%2Cw_1400/MTc1NDA2Mzg2MjU0MDYzMjEw/locust-pose.jpg 1400w" data-sizes="(min-width: 675px) 700px, 100vw" data-thumbnail="https://www.yogajournal.com/.image/c_fill%2Ccs_srgb%2Cg_face%2Ch_80%2Cq_auto:good%2Cw_80/MTc1NDA2Mzg2MjU0MDYzMjEw/locust-pose.jpg" data-title="Salabhasana (Locust Pose)">Benefit of the pose: Bow opens up the whole front side of your body—quads, hip flexors, abdominals, chest, and shoulders—while strengthening the entire backside of your body, including your hamstrings, glutes, back extensors, and upper back. Since it requires intense levels of exertion, it helps your body release tension and pent-up energy. This pose is great for offsetting excessive amounts of forward flexion—think about how spine and shoulders round after spendings hours at a laptop.Getting into the pose: Lie on your belly and open your shoulders as you reach your hands back to clasp your ankles. Flex your feet and draw your thighs inward toward your midline. Press your ankles into your hands and hold your ankles firmly. Engage your core center and lift your legs up and away from your torso.
Holding the pose: Keep a strong core center and continue to lift through the crown of your head as you press your ankles into your hands.
See also Challenge Pose: Dhanurasana (Bow Pose)
" data-full-src="https://www.yogajournal.com/.image/ar_3:2%2Cc_limit%2Ccs_srgb%2Cfl_progressive%2Cq_auto:good%2Cw_700/MTc1NDA2Mzg2MjUzOTk3Njc0/bow-pose-2.jpg" data-image-id="ci026f2b2f1000276a" data-image-slug="Bow Pose (2)" data-public-id="MTc1NDA2Mzg2MjUzOTk3Njc0" data-srcset="https://www.yogajournal.com/.image/ar_3:2%2Cc_limit%2Ccs_srgb%2Cfl_progressive%2Cq_auto:good%2Cw_320/MTc1NDA2Mzg2MjUzOTk3Njc0/bow-pose-2.jpg 320w, https://www.yogajournal.com/.image/ar_3:2%2Cc_limit%2Ccs_srgb%2Cfl_progressive%2Cq_auto:good%2Cw_700/MTc1NDA2Mzg2MjUzOTk3Njc0/bow-pose-2.jpg 700w, https://www.yogajournal.com/.image/ar_3:2%2Cc_limit%2Ccs_srgb%2Cfl_progressive%2Cq_auto:good%2Cw_960/MTc1NDA2Mzg2MjUzOTk3Njc0/bow-pose-2.jpg 960w, https://www.yogajournal.com/.image/ar_3:2%2Cc_limit%2Ccs_srgb%2Cfl_progressive%2Cq_auto:good%2Cw_1400/MTc1NDA2Mzg2MjUzOTk3Njc0/bow-pose-2.jpg 1400w" data-sizes="(min-width: 675px) 700px, 100vw" data-thumbnail="https://www.yogajournal.com/.image/c_fill%2Ccs_srgb%2Cg_face%2Ch_80%2Cq_auto:good%2Cw_80/MTc1NDA2Mzg2MjUzOTk3Njc0/bow-pose-2.jpg" data-title="Dhanurasana (Bow Pose)">Benefit of the pose: Bridge pose is an excellent way to stretch the front of your hips and open your chest, particularly if you sit for long periods or regularly walk, run, or cycle. Many people have tight hip flexors from too much walking, running, cycling, or even just sitting or driving. Bridge pose also targets muscles deep in your lower back and hips that are difficult to reach when upright. This pose will strengthen your glutes, hamstrings, adductors, and abductors. It will also stretch your hip flexors, core center, and pectorals.Getting into the pose: Lie down on your back with your knees bent, feet on the ground and hip-width apart, and palms down. Slide your shoulders away from your ears toward your feet. Press your feet into the ground to lift your hips. Draw your shoulders toward your middle back and interlace your hands under your back body.
Holding the pose: Keep your head still to protect your neck—don’t look around. Engage your inner thighs to keep your knees in line with your hips and toes. Breathe deeply into your open chest and naval center.
See also 6 Steps to Master Bridge Pose
" data-full-src="https://www.yogajournal.com/.image/ar_3:2%2Cc_limit%2Ccs_srgb%2Cfl_progressive%2Cq_auto:good%2Cw_700/MTc1NDA2Mzg2MjU0MTI4NzQ2/bridge-pose.jpg" data-image-id="ci026f2b2f2000266a" data-image-slug="Bridge Pose" data-public-id="MTc1NDA2Mzg2MjU0MTI4NzQ2" data-srcset="https://www.yogajournal.com/.image/ar_3:2%2Cc_limit%2Ccs_srgb%2Cfl_progressive%2Cq_auto:good%2Cw_320/MTc1NDA2Mzg2MjU0MTI4NzQ2/bridge-pose.jpg 320w, https://www.yogajournal.com/.image/ar_3:2%2Cc_limit%2Ccs_srgb%2Cfl_progressive%2Cq_auto:good%2Cw_700/MTc1NDA2Mzg2MjU0MTI4NzQ2/bridge-pose.jpg 700w, https://www.yogajournal.com/.image/ar_3:2%2Cc_limit%2Ccs_srgb%2Cfl_progressive%2Cq_auto:good%2Cw_960/MTc1NDA2Mzg2MjU0MTI4NzQ2/bridge-pose.jpg 960w, https://www.yogajournal.com/.image/ar_3:2%2Cc_limit%2Ccs_srgb%2Cfl_progressive%2Cq_auto:good%2Cw_1400/MTc1NDA2Mzg2MjU0MTI4NzQ2/bridge-pose.jpg 1400w" data-sizes="(min-width: 675px) 700px, 100vw" data-thumbnail="https://www.yogajournal.com/.image/c_fill%2Ccs_srgb%2Cg_face%2Ch_80%2Cq_auto:good%2Cw_80/MTc1NDA2Mzg2MjU0MTI4NzQ2/bridge-pose.jpg" data-title="Setu Bandha Sarvangasana (Bridge Pose)">Benefit of the pose: This pose stimulates your abdominal organs and can feel very grounding.Getting into the pose: From a supine position, draw your knees into your chest, holding your legs behind your thighs. For a light back massage, rock gently from side to side.
Variations: Use a towel or strap to reach around your thighs if there is limited hip flexion.
See also 20-Minute Sequence to Ease Back Pain
" data-full-src="https://www.yogajournal.com/.image/ar_3:2%2Cc_limit%2Ccs_srgb%2Cfl_progressive%2Cq_auto:good%2Cw_700/MTc1NDA2Mzg2MjU0MTI5MDAy/knees-to-chest-pose-2.jpg" data-image-id="ci026f2b2f7000276a" data-image-slug="Knees to Chest Pose (2)" data-public-id="MTc1NDA2Mzg2MjU0MTI5MDAy" data-srcset="https://www.yogajournal.com/.image/ar_3:2%2Cc_limit%2Ccs_srgb%2Cfl_progressive%2Cq_auto:good%2Cw_320/MTc1NDA2Mzg2MjU0MTI5MDAy/knees-to-chest-pose-2.jpg 320w, https://www.yogajournal.com/.image/ar_3:2%2Cc_limit%2Ccs_srgb%2Cfl_progressive%2Cq_auto:good%2Cw_700/MTc1NDA2Mzg2MjU0MTI5MDAy/knees-to-chest-pose-2.jpg 700w, https://www.yogajournal.com/.image/ar_3:2%2Cc_limit%2Ccs_srgb%2Cfl_progressive%2Cq_auto:good%2Cw_960/MTc1NDA2Mzg2MjU0MTI5MDAy/knees-to-chest-pose-2.jpg 960w, https://www.yogajournal.com/.image/ar_3:2%2Cc_limit%2Ccs_srgb%2Cfl_progressive%2Cq_auto:good%2Cw_1400/MTc1NDA2Mzg2MjU0MTI5MDAy/knees-to-chest-pose-2.jpg 1400w" data-sizes="(min-width: 675px) 700px, 100vw" data-thumbnail="https://www.yogajournal.com/.image/c_fill%2Ccs_srgb%2Cg_face%2Ch_80%2Cq_auto:good%2Cw_80/MTc1NDA2Mzg2MjU0MTI5MDAy/knees-to-chest-pose-2.jpg" data-title="Apanasana (Knees-to-Chest Pose)">Benefit of the pose: Forward folds are cooling and relaxing poses. Over 80 percent of Americans experience some lower back discomfort in their lifetimes. Holding and breathing in forward folds will not only help lengthen your tight hamstrings and lower back muscles, but it will also relax you, combating the harmful effects of stress on your mind and body. Anytime you are holding a forward bend or when your head is moving toward the earth (as in Downward Dog), breathe deeply. Focus on completing your exhale, elongating, and releasing muscles from the back of your legs, up to your spine, perhaps even to that tight place between your ears.Getting into the pose: From a seated position, extend your legs. Draw your toes back toward your body. Reach forward, placing your hands on your legs, ankles, feet, or the floor. Using your abs, draw your torso forward through the top of your head.
Holding the pose: Using your breath, continue to lengthen through your heart and head. Firm your quad muscles. Relax your shoulders back and down. Enjoy the stretch.
Variations: For tight hamstrings, sit on a folded blanket or a rolled-up yoga mat, use a strap or towel around your feet, or bend your knees. Take it to the next level: Bend one knee, bringing your foot flat to the floor, toes pointing forward. Keeping your knee pointing straight up, reach forward.
See also Forward Bend Yoga Poses
Try this yoga starter kit to support you in this pose and many others.
" data-full-src="https://www.yogajournal.com/.image/ar_3:2%2Cc_limit%2Ccs_srgb%2Cfl_progressive%2Cq_auto:good%2Cw_700/MTc1NDA2Mzg2MjU0MDYzNDY2/seated-forward-fold.jpg" data-image-id="ci026f2b2fc000266a" data-image-slug="Seated Forward Fold" data-public-id="MTc1NDA2Mzg2MjU0MDYzNDY2" data-srcset="https://www.yogajournal.com/.image/ar_3:2%2Cc_limit%2Ccs_srgb%2Cfl_progressive%2Cq_auto:good%2Cw_320/MTc1NDA2Mzg2MjU0MDYzNDY2/seated-forward-fold.jpg 320w, https://www.yogajournal.com/.image/ar_3:2%2Cc_limit%2Ccs_srgb%2Cfl_progressive%2Cq_auto:good%2Cw_700/MTc1NDA2Mzg2MjU0MDYzNDY2/seated-forward-fold.jpg 700w, https://www.yogajournal.com/.image/ar_3:2%2Cc_limit%2Ccs_srgb%2Cfl_progressive%2Cq_auto:good%2Cw_960/MTc1NDA2Mzg2MjU0MDYzNDY2/seated-forward-fold.jpg 960w, https://www.yogajournal.com/.image/ar_3:2%2Cc_limit%2Ccs_srgb%2Cfl_progressive%2Cq_auto:good%2Cw_1400/MTc1NDA2Mzg2MjU0MDYzNDY2/seated-forward-fold.jpg 1400w" data-sizes="(min-width: 675px) 700px, 100vw" data-thumbnail="https://www.yogajournal.com/.image/c_fill%2Ccs_srgb%2Cg_face%2Ch_80%2Cq_auto:good%2Cw_80/MTc1NDA2Mzg2MjU0MDYzNDY2/seated-forward-fold.jpg" data-title="Paschimottanasana (Seated Forward Bend)">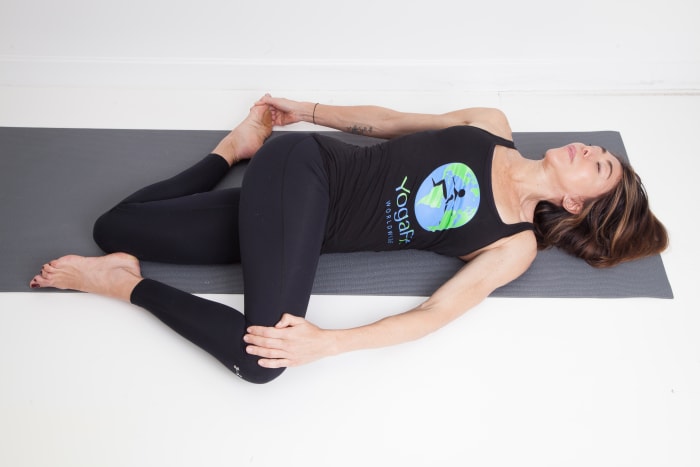
We independently source all of the products that we feature on yogajournal.com. If you buy from the links on our site, we may receive an affiliate commission, which in turn supports our work.

