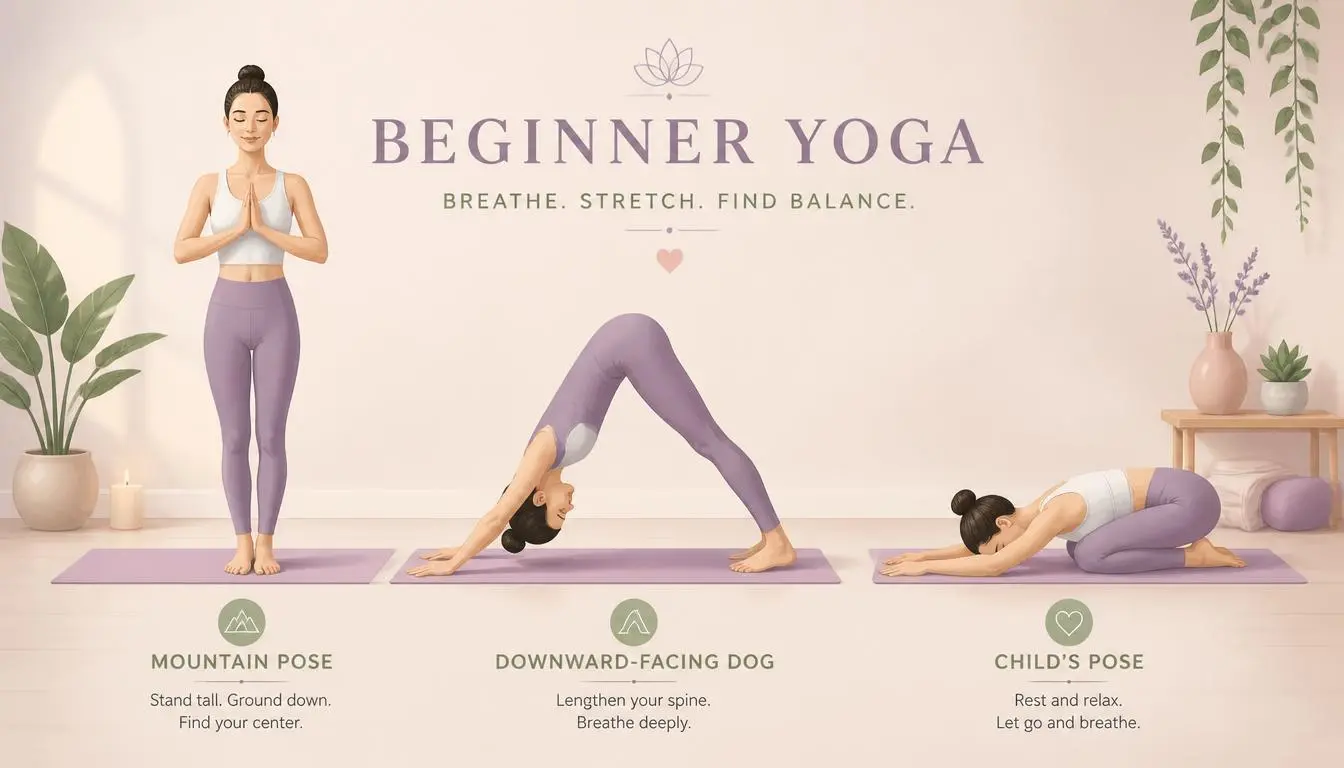
Yoga Poses For Tight Hip Flexors
If you spend most of your day sitting at a desk, in a car, or on a couch, your hip flexors are probably tighter than they should be. These muscles at the front of your hips stay in a shortened position for hours on end. Over time, they adapt to that position and become stiff and weak. The result is a feeling of tightness in the front of your hips, discomfort in your lower back, and difficulty moving freely.
Yoga offers a practical solution. The poses in this guide are designed to lengthen your hip flexors, release tension in the surrounding muscles, and help you move with greater ease. You do not need to be flexible to start. You just need a mat, some floor space, and a few minutes each day.
This guide covers everything you need to know. You will learn what hip flexors are, why they get tight, which yoga poses help the most, how to do each pose with proper form, and how to build a simple routine that fits your life.
What Are Your Hip Flexors?
Your hip flexors are a group of muscles at the front of your hip that lift your knee toward your chest. Every time you walk, climb stairs, or stand up from a chair, you use them. The main muscles in this group include the psoas major, iliacus, rectus femoris, sartorius, and tensor fasciae latae.
Two of these muscles deserve special attention. The psoas major runs from your lower spine through your pelvis and attaches to the top of your thigh bone. The iliacus starts on the inside of your pelvic bowl and joins the psoas as they travel down to your thigh. Together, they are often called the iliopsoas. This muscle group is powerful. It helps stabilize your spine and plays a role in nearly every movement that involves your hips.
When your hip flexors are healthy, they lengthen and shorten as you move. When they are tight, they stay short and resist lengthening. This can pull your pelvis forward into a position called anterior pelvic tilt. That forward tilt increases the curve in your lower back and can lead to back pain.
Why Your Hip Flexors Get Tight?
The most common cause of tight hip flexors is sitting. When you sit, your hips are bent at roughly a 90-degree angle. Your hip flexors are in a shortened position. If you sit for hours every day, your muscles adapt to that shortened length.
This does not mean sitting is the only culprit. Running, cycling, and any activity that involves lifting your knees repeatedly can also tighten these muscles. The muscles become strong but short.
There is another factor that many people overlook. Weak hip flexors can also feel tight. When a muscle is weak, your nervous system may keep it in a guarded, contracted state. Stretching alone will not fix this. You need to strengthen these muscles too.
The good news is that yoga does both. Many poses lengthen the hip flexors while also asking them to work. This combination of stretching and strengthening is what makes yoga so effective for this area.
Read Also: Gentle Yoga Poses For Beginners
How to Know If Your Hip Flexors Are Tight?
You can test your hip flexor flexibility at home with a simple check. Lie on your back on a firm surface, such as a bed or a massage table. Your hips should be near the edge so your legs can hang off. Pull one knee toward your chest and hold it. Let the other leg relax and hang down. If that leg does not drop to the level of the surface, your hip flexors are tight.
Other signs of tight hip flexors include:
-
A feeling of stiffness or pinching at the front of your hip after sitting for a while
-
Lower back discomfort that gets worse with standing or walking
-
Difficulty straightening your hip fully when you walk
-
A feeling that your stride is shorter than it used to be
If you notice these signs, a consistent yoga practice can help.
Yoga Poses for Tight Hip Flexors
The poses below are arranged from gentler to more intense. Start with the first few and add more as your hips open up. Hold each pose for at least 30 seconds to give the muscle time to relax. Breathe slowly and deeply throughout.
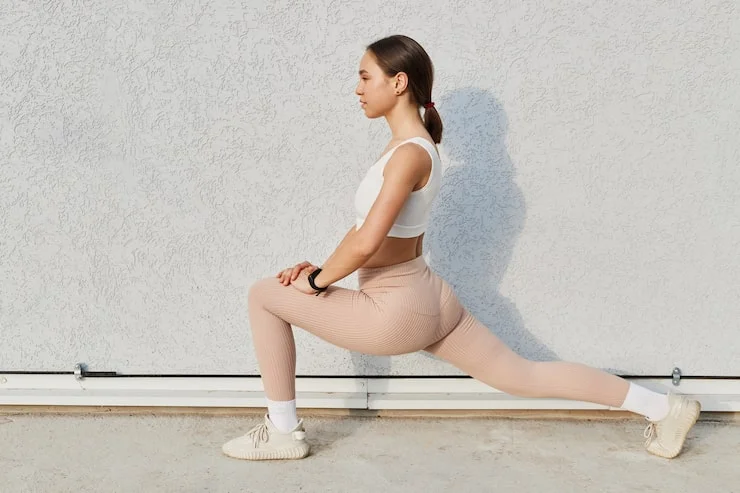
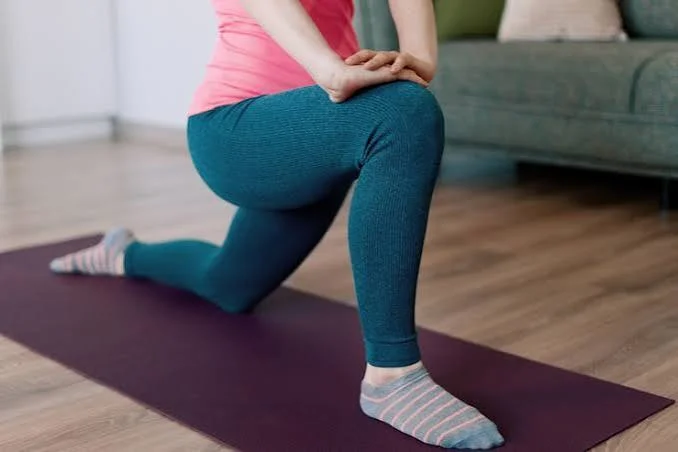
Low Lunge (Anjaneyasana)
Low Lunge is one of the most direct stretches for the hip flexors, especially the psoas. It is accessible for almost everyone and can be modified in several ways.
How to do it:
Start on your hands and knees. Step your right foot forward and place it between your hands. Your right knee should be directly above your right ankle. Slide your left knee back until you feel a stretch at the front of your left hip. Keep your left knee on the mat or place a folded blanket under it for cushion. Bring your hands to your right thigh and lift your chest. Tuck your pelvis slightly by drawing your lower belly in and squeezing your left glute. This pelvic tuck is what makes the stretch effective. Without it, you may feel the stretch in your lower back instead of your hip. Hold for 30 to 60 seconds, then switch sides.
Why it works: Low Lunge puts your back hip into extension, which lengthens the psoas and iliacus. Tucking your pelvis increases the stretch by reducing the arch in your lower back.
Modification: If your back knee is uncomfortable, place a folded blanket or towel under it. If balancing is difficult, keep your hands on the mat or on yoga blocks instead of your thigh.
Pigeon Pose (Kapotasana)
Pigeon Pose is a classic hip opener that stretches the hip flexors of your back leg and the outer hip of your front leg. It is more intense than Low Lunge, so approach it gradually.
How to do it:
From Downward-Facing Dog, bring your right knee forward and place it behind your right wrist. Your right shin will angle across your mat. Your right foot can be anywhere from parallel to your mat to tucked in toward your left hip. Slide your left leg straight back. Keep your hips level. If your right hip is lifted, place a folded blanket or block under it. Stay upright with your hands on the mat, or fold forward over your right shin. Hold for 30 seconds to 1 minute, then switch sides.
Why it works: The back leg is in hip extension, which stretches the hip flexors. The front leg is in external rotation, which releases tension in the outer hip and glutes.
Modification: If Pigeon Pose is too intense, try Reclined Pigeon instead. Lie on your back, cross your right ankle over your left thigh, and draw your left thigh toward your chest. This gives you a similar stretch without putting pressure on your knee.
Crescent Lunge (High Lunge)
Crescent Lunge is a standing pose that stretches the hip flexors of your back leg while strengthening your front leg. It is a good pose to include in a flow because it builds heat and stability.
How to do it:
From Mountain Pose, step your left foot back about three feet. Keep your right foot forward. Bend your right knee to about 90 degrees. Straighten your left leg and press your left heel toward the floor. Tuck your pelvis slightly and engage your left glute. Reach your arms overhead. Keep your ribs down so your lower back does not arch. Hold for 5 to 10 breaths, then switch sides.
Why it works: The back leg is in full hip extension, which provides a strong stretch for the psoas and rectus femoris. The pelvic tuck ensures the stretch stays in the hip rather than the lower back.
Modification: If reaching your arms overhead causes your back to arch, keep your hands on your hips or bring them into a prayer position at your chest.
Warrior I (Virabhadrasana I)
Warrior I is similar to Crescent Lunge but with a wider stance and the back foot turned out. It is a foundational pose that teaches you how to find a neutral pelvis while stretching the hip flexors.
How to do it:
Stand with your feet about three to four feet apart. Turn your right foot out 90 degrees and your left foot in slightly. Bend your right knee so it aligns over your right ankle. Keep your left leg straight and press your left heel down. Square your hips toward the front of your mat. This may require adjusting your left foot further out. Tuck your pelvis and lift your chest. Reach your arms overhead. Hold for 5 to 10 breaths, then switch sides.
Why it works: Warrior I stretches the hip flexors of the back leg while also strengthening the glutes and thighs. The squared hip position makes it a more focused stretch than Crescent Lunge.
Modification: If your hips do not square easily, shorten your stance. You can also practice with your hands on your hips before adding the arm reach.
Lizard Pose (Utthan Pristhasana)
Lizard Pose is a deep hip opener that stretches the hip flexors, inner thighs, and groin. It is similar to Low Lunge but with both hands inside the front foot.
How to do it:
From Downward-Facing Dog, step your right foot forward to the outside of your right hand. Your right knee will be near your right shoulder. Keep your left knee on the mat or lift it for a more active variation. Bring both hands inside your right foot and place them on the mat or on blocks. If you want a deeper stretch, come down onto your forearms. Hold for 30 seconds to 1 minute, then switch sides.
Why it works: The position of your front leg creates a deep stretch in the inner thigh and groin. The back leg stretches the hip flexors. It is a comprehensive pose for the entire hip area.
Modification: Use blocks under your hands if reaching the floor is difficult. Keep your back knee down if lifting it is too challenging.
Garland Pose (Malasana)
Garland Pose, also called Squat, is a deep hip flexion pose. It stretches the hips, groin, and ankles while also strengthening the legs and core.
How to do it:
Stand with your feet slightly wider than your hips, toes pointing slightly out. Bend your knees and lower your hips toward the floor. If your heels lift, place a folded blanket under them. Bring your hands together in a prayer position and rest your elbows on the inside of your knees. Use your elbows to gently press your knees outward. Keep your spine straight and your chest lifted. Hold for 30 seconds to 1 minute.
Why it works: Squatting is a natural human position that many people lose the ability to do. It requires full hip flexion, which stretches the hip flexors and opens the pelvis.
Modification: If squatting is difficult, sit on a yoga block or a stack of books. You can also hold onto a doorframe or sturdy furniture for support.
Cow Face Pose (Gomukhasana)
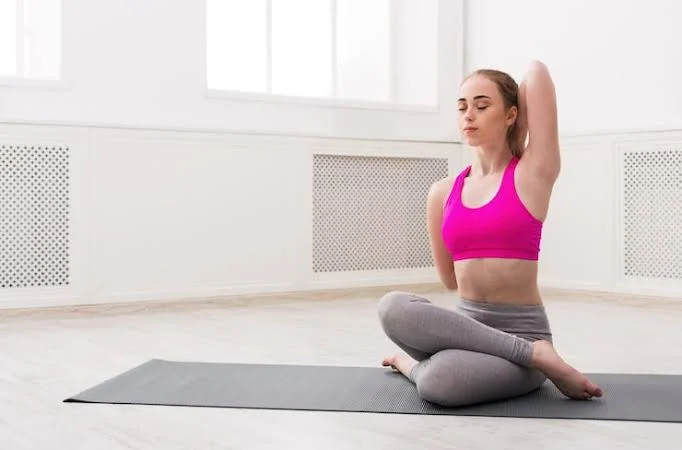
Cow Face Pose is a seated pose that stretches the outer hips, glutes, and hip flexors. It also provides a stretch for the shoulders and chest when you bring your arms into position.
How to do it:
Sit on the floor with your legs extended. Bend your right knee and bring your right foot toward your left hip. Bend your left knee and stack it directly on top of your right knee. Your left foot will come toward your right hip. If your hips are tight, your knees may not stack. You can sit on a folded blanket to tilt your pelvis forward and make the pose more accessible. Sit tall and breathe. If you want to add the arm position, reach your right arm up and bend your elbow so your hand comes down your back. Reach your left arm behind you and try to clasp your fingers. Hold for 30 seconds to 1 minute, then switch sides.
Why it works: The stacked leg position creates external rotation in both hips, which stretches the outer hip and glute muscles. The forward tilt of the pelvis from sitting on a blanket also stretches the hip flexors.
Modification: If stacking your knees is painful, simply cross your legs in a comfortable seated position. Use a strap or towel between your hands if they do not meet behind your back.
Happy Baby Pose (Ananda Balasana)
Happy Baby is a gentle, restorative pose that releases tension in the hips, inner thighs, and lower back. It is a good pose to end a hip-focused practice.
How to do it:
Lie on your back. Draw both knees toward your chest. Reach your hands to the outside edges of your feet. If you cannot reach your feet, hold your ankles, shins, or use a strap around your feet. Open your knees slightly wider than your torso. Keep your ankles directly over your knees. Gently draw your knees toward your armpits. Keep your lower back and head resting on the floor. You can rock side to side to massage your spine. Hold for 30 seconds to 1 minute.
Why it works: This pose puts your hips into flexion and external rotation, which stretches the hip flexors and inner thighs without any weight-bearing pressure. It is a passive stretch, which allows your muscles to relax more completely.
Modification: If reaching your feet is difficult, hold behind your thighs instead. You can also place a folded blanket under your head for comfort.
Half Frog Pose (Ardha Bhekasana)
Half Frog Pose is a more intense stretch for the hip flexors and quadriceps. It is best done after you have warmed up with gentler poses.
How to do it:
Lie on your stomach with your upper body propped up on your forearms. Bend your left knee and bring your left foot toward your buttocks. Reach back with your left hand and grab your left foot or ankle. Press your foot gently toward the floor. You should feel a stretch at the front of your left thigh and hip. Keep your hips level and press your right hip into the floor. Hold for 20 to 30 seconds, then switch sides.
Why it works: This pose stretches the rectus femoris, one of the hip flexor muscles that also crosses the knee joint. It is a deeper stretch than most other poses because it targets the quadriceps as well as the hip flexors.
Modification: If grabbing your foot is difficult, use a strap around your ankle. Do not force the stretch. Stop if you feel any pinching in your knee.
You May Also Like: Yoga For Lower Back Pain Beginners
How to Build a Hip Flexor Yoga Routine
You do not need to do every pose in this guide every day. A short, consistent practice is more effective than an occasional long one. Here is a simple routine you can do in about 15 minutes.
Warm-up (2 minutes): Start with gentle movement. Cat-Cow stretches your spine and warms up your hips. Do 5 to 10 rounds.
Pose 1: Low Lunge (1 minute each side). This is your primary hip flexor stretch. Focus on the pelvic tuck.
Pose 2: Pigeon Pose or Reclined Pigeon (1 minute each side). This releases the outer hips and glutes.
Pose 3: Crescent Lunge or Warrior I (45 seconds each side). This adds a strengthening component to the stretch.
Pose 4: Garland Pose (1 minute). This opens the hips in a different direction.
Pose 5: Happy Baby (1 minute). This is your cool-down. Let your body relax into the stretch.
Finishing (1 minute): Lie on your back with your knees bent and feet flat on the floor. Take slow, deep breaths. Let your hips settle.
If you have more time, add Lizard Pose, Cow Face Pose, or Half Frog Pose. If you have less time, just do Low Lunge and Happy Baby. Those two poses alone will make a difference if you do them consistently.
How Often Should You Stretch?
Research on hip flexor stretching shows that consistency matters more than duration. One study found that a 10-week stretching program improved hip extension range of motion and walking speed in older adults. Another study on athletes found that 8 weeks of stretching improved hip range of motion, reduced low back pain, and enhanced jumping performance.
A practical guideline is to stretch your hip flexors 3 to 5 times per week. Each stretch should be held for 20 to 30 seconds, and you can repeat each pose 2 to 4 times per side. If you are very tight, start with shorter holds and fewer repetitions. Build up gradually.
Some people find that gentle stretching feels good every day. Listen to your body. If you feel soreness the next day, give yourself a rest day. If you feel nothing, you can hold the poses longer or go slightly yoga poses for tight hip flexors.
Common Mistakes to Avoid
Letting your lower back arch. When you stretch your hip flexors, the goal is to move your hip, not your spine. If you feel the stretch in your lower back instead of the front of your hip, you need to tuck your pelvis more. Draw your lower belly in and squeeze the glute of the back leg.
Bouncing or forcing the stretch. Your muscles have a protective reflex that causes them to tighten when they are pushed too far too fast. Breathe slowly and let the stretch happen gradually. Sharp pain is a signal to back off.
Only stretching, never strengthening. As mentioned earlier, weak hip flexors can feel tight. If you only stretch, you may not solve the problem. Poses like Crescent Lunge and Warrior I strengthen the hip flexors while stretching them. You can also add exercises like leg lifts and marching in place.
Ignoring pain in the front of the hip. If you feel a pinching sensation at the front of your hip during a stretch, your hip joint may be getting compressed. Reduce the depth of the stretch, tuck your pelvis more, or choose a different pose. Sharp pain is never the goal.
Frequently Asked Questions
How long does it take to see results from stretching tight hip flexors?
Most people notice some improvement in how their hips feel within one to two weeks of consistent stretching. Measurable changes in range of motion typically take four to six weeks of regular practice. The key is consistency. Stretching once a week will not produce the same results as stretching four or five times a week.
Can I do these poses if I have lower back pain?
Yes, but you need to be careful. Tight hip flexors can contribute to lower back pain, so stretching them may help. However, if you have a disc problem or another specific back condition, some poses may not be appropriate. Focus on poses where you can keep your lower back neutral, such as Low Lunge with a strong pelvic tuck. Avoid deep backbends. If your back pain worsens with stretching, stop and consult a healthcare provider.
Should I stretch before or after other exercise?
For general flexibility, stretching after exercise is often more comfortable because your muscles are warm. Some research suggests that static stretching before activities like jumping or sprinting may temporarily reduce power output. If you want to stretch before a workout, keep the holds short (5 to 10 seconds) and gentle. Save the longer holds for after your workout or at the end of the day.
Can tight hip flexors cause knee pain?
Yes. The rectus femoris is a hip flexor that also crosses the knee joint. When it is tight, it can pull on the kneecap and contribute to pain under the kneecap, sometimes called runner's knee. Stretching the hip flexors, especially the quadriceps portion, can help reduce this pull.
How do I know if I am stretching too much?
A good stretch should feel like a gentle pull or tension in the muscle. It should not feel sharp, burning, or like a joint is being pinched. If you feel sharp pain, numbness, or tingling, stop. Soreness the next day that feels like muscle fatigue is normal. Pain that limits your movement is not.
When to See a Healthcare Provider
Yoga and stretching can help with general tightness and stiffness. But some symptoms need professional attention. See a doctor or physical therapist if:
-
You have hip or groin pain that lasts more than a week or keeps coming back
-
Pain limits your ability to walk, climb stairs, or do daily activities
-
You feel numbness, tingling, or pain that travels down your thigh or into your back
-
You hear or feel clicking or snapping in your hip that is painful
-
You have swelling, redness, or warmth around the hip joint
-
You have had a recent injury or fall
A healthcare provider can determine whether your symptoms are coming from muscle tightness or something else, such as a joint problem, a labral tear, or a nerve issue. They can also teach you specific exercises that are safe for your situation.
The Bottom Line
Tight hip flexors are a common problem, especially for people who sit a lot. The good news is that a consistent yoga practice can make a real difference. The poses in this guide stretch the hip flexors, release tension in the surrounding muscles, and help restore normal movement.
Start with Low Lunge and Happy Baby. Do them most days of the week. Add more poses as your hips open up. Pay attention to your pelvic position, breathe slowly, and never force a stretch. With time and consistency, you will notice a difference in how your hips feel and how you move.